Showing posts with label Eggs. Show all posts

Friday, 27 April 2012

Egg Freshness Float Tests and Stuff

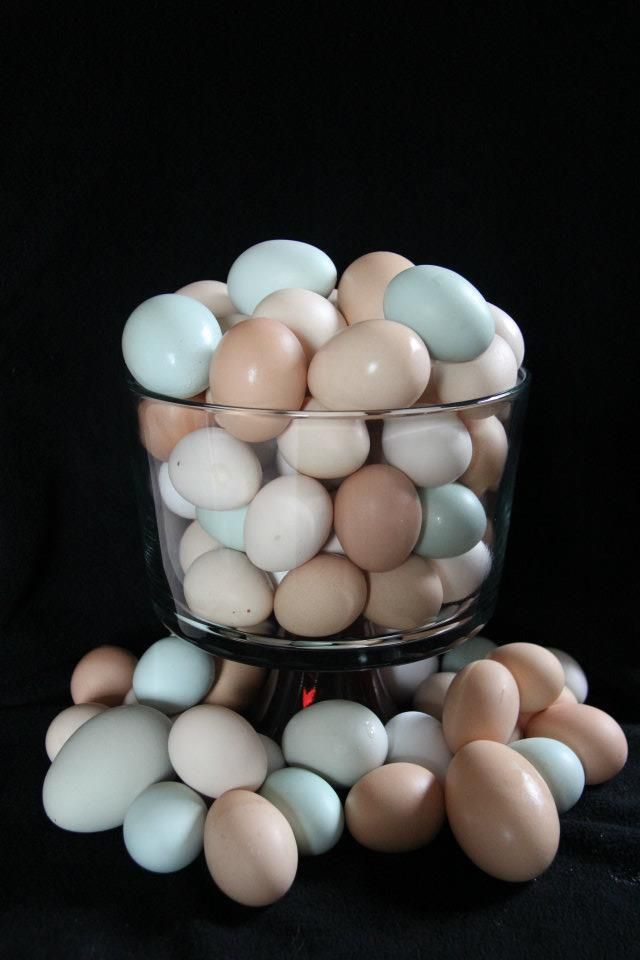
So you notice that the egg production has dropped way down and your wondering what the heck is going on.  Then you move something in the barn or hen house and there is a nice big mountain of eggs, and it dawns on you... Those sneaky hens are hiding the eggs!  Or maybe like me, you keep a bowl of eggs in the fridge and add the small little ones that are for personal use to it daily.  But once in a while you get so many eggs it's hard to keep up on the use of them.

Then you're left wondering just how fresh some of those eggs are.  Yes, you could toss them.  But why toss the good ones along with the bad.  Most of the time, even our 'old' eggs are fresher then the ones you are buying off the self in the grocery store.  

Heck, you could even test it out on your store bought eggs if you are wondering just how fresh those babies are.  Have you ever used store bought eggs and went to boil them and seen them floating and bobbing around in the pot.


Fill a container up with warm water.  I use warm water.  The reason for this is.  Eggs are porous.  If you put an egg in cold water, it will contract and draw any bacteria that is on the outside of the shell in through the pores.  This is not good.  So, if you use warm water, the egg will expand, and you will notice that little air bubbles form on the shell.

Put your eggs into the warm water, and look at them.  A very fresh egg will sink to the bottom and lay on it's side.  Week old eggs will rest on the bottom but the fat end of the egg will rise up slightly.  Three week old eggs will be balanced on pointy end with the fat end sticking up.  Old eggs will be floating, bobbing along the surface of the water.  These floaters should be tossed as they aren't any good to eat.  Or if you have chickens just cook 'em up and feed them back to the chickens.


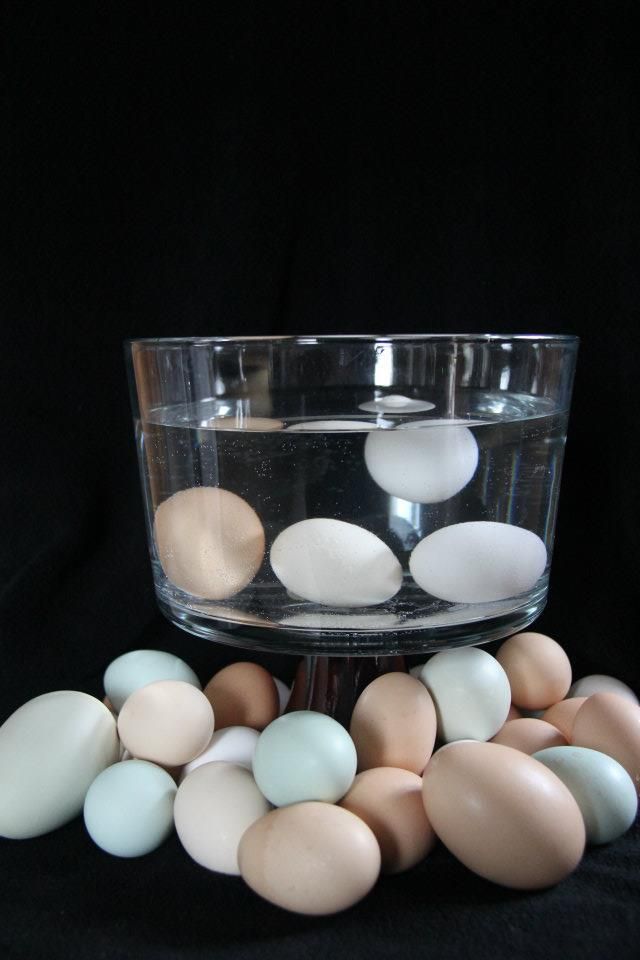
As eggs age, the air cell in the fat end gets bigger as moisture evaporates from the egg and the air cell increases, causing the egg to float.

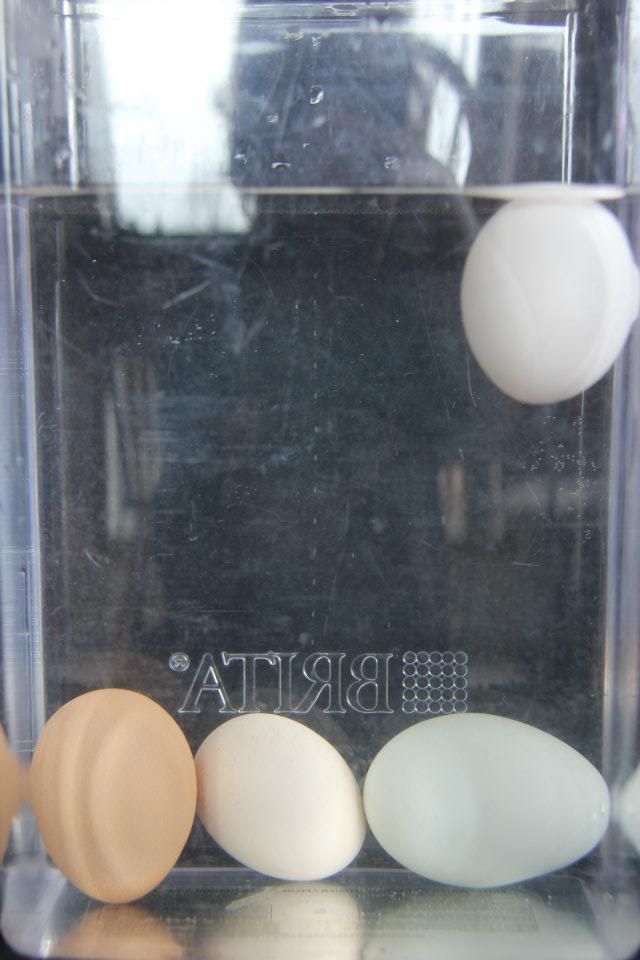
You can see the difference a little better in this container.

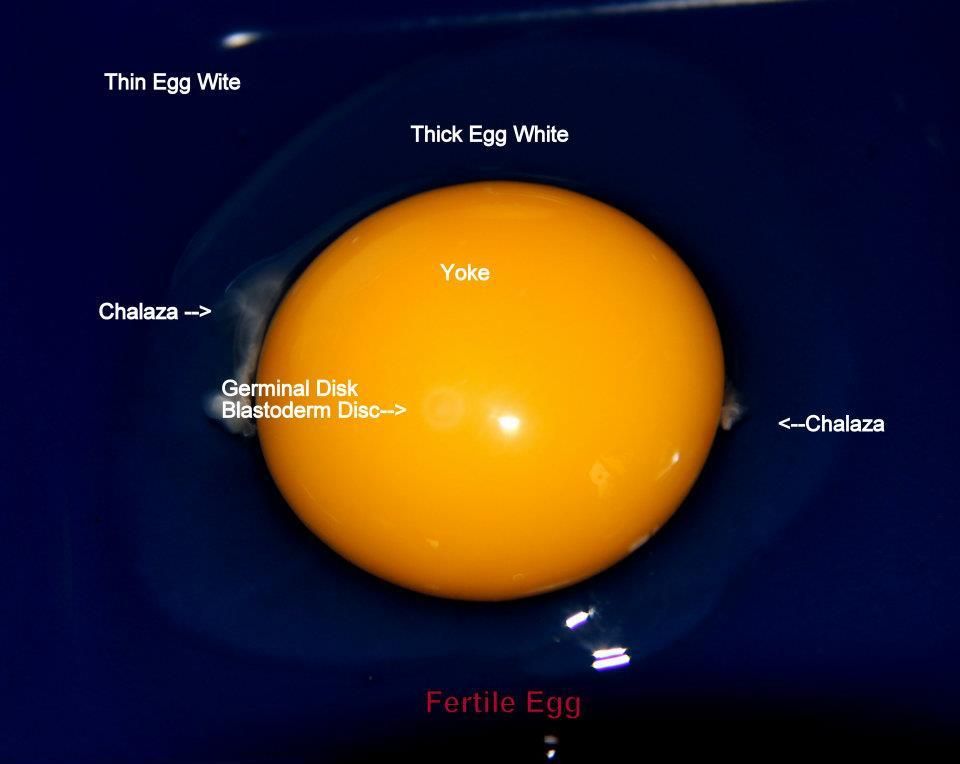
Another way to tell if your egg is fresh is to crack it and have a look.  With a very fresh egg,  the white will have a cloudy look to it.  This is cause by carbon dioxide still in the egg present when the egg is laid.  As the egg ages it will become clear.  A fresh egg will have more thick egg white with a bit of the thin.  As the egg ages the thick egg white will break down and become thinner.  A fresh egg will have lots of nice firm egg white and the yoke will be siting nice and high and round.  The yoke will also sort of break down too, and become less firm, breaking when it hits the pan.

Yet another indicator is the Chalaza in the egg.  This is those little squiggly white things in the egg that often get mistaken for a partially formed chick or something left over from the rooster.  The Chalaza is actually like a twisted springy anchor that holds the yoke safe in the middle of the egg.  It is attached to the outer layers of the egg and when you crack that egg, it springs in close to the yoke.  These are not harmful to eat at all.  As the egg ages, the Chalaza breaks down and in old eggs it will barely be visible.  If you hold an old egg up to a flash light in a darkened room you would notice that the yoke will float around more inside the egg if you move the egg around.  This is because the Chalaza is breaking down.

Sometimes when you crack an egg, you will find a blood spot or a little piece of something that looks like meat.  These are not harmful either, and the egg can still be eaten.  You could just scoop out that spot with a spoon.  This happens when the egg is being formed and a blood vessel breaks. The meat spot is what happens when the blood clots.  It does not mean that the egg is fertilized or is a chick forming.  

So, maybe you are wondering just how you will be able to tell if that egg you are about to eat is fertile?  Or maybe you want to incubate some eggs and what to figure it out without firing up the incubator to test a few.  

Well, on the egg is a spot called a Germinal Disc.  If the egg is not fertilized, it is called a Blastodisc.  The spot will be small and unevenly shaped.


If the egg is fertile, the Germinal Disc is called a Blastoderm.  It will be round in shape and sort of look like a ring.


And there you have it!  

Wednesday, 14 March 2012

Let the hatching begin!

Last night I figured I would test out my new candler I made to fit over my husbands big flash light and I had a surprise!  The first egg I picked up peeped!  I thought I was hearing things, because after all, I gave them the hatch date of March 19th and that is not until Monday.  I had a closer look at the egg in my hand and sure enough there was a pip!

Of course, my curiosity got the better of me, and since I had my home made candler set up right there, I had to pop it on to get a look at it!  Usually I don't candle during lock down. Usually it's right before I put them in lock down to remove any dead eggs.

Turns out that I counted wrong when I gave them their hatch date.  I recounted, and the 'new' date is supposed to be March 15th.  I counted several times to be sure this time.  So the eggs are actually starting to pip on day 19!

There was one polish egg pipped and one cochin egg pipped, as well as peeping coming from an Easter Egger egg.  You can only imagine my excitement and surprise!


Broken into the Air Cell.  Polish Egg.

This one isn't there yet.  You can still see the blood vessels in this one.  It was alive and moving around.

Cochin egg, into the air cell.

This is an egg that has not been incubated.  Freshly laid.


So I took the racks out and put them on their sides.  I usually would put them fat sides up in an egg carton for hatching, but didn't want to take the extra time to do this with the lid off.  So I hope this changing of position at this stage doesn't have a bad effect on them.  

I also put added more water to the water troughs and a couple wet sponges to try and up the humidity.  The humidity has been about 40% lately.  It went up to 55%, and a little while ago I cracked the bottom open and squirted some warm water in there to try and up it more.  I hope it isn't to dry in there.

Oh, Yay!  Just now as I was typing, I heard exciting peeping and went and checked, and there was an Easter Egg chick out of it's egg.  I checked about 15 minutes before, and it just had a fair sized hole pecked!  And the polish egg that I first saw pipped last night is starting to zip!  

Here's the first Chick!  An Easter Egger wins the race!

The polish egg that was pipped last night started to zip right after the Easter Egger hatched.

And zips some more...

A little more zipping, and it gives a stretch...

It gets it's foot up...
And out...

Getting ready for the big shove...

At last it lifts it's head.

Hatching is hard work...

Stretching the wings for the first time!

And at last the Easter Egger chick has a friend!

As of now there are 4 hatched, and 23 eggs left to go!

Let the hatching begin!!!!


Thought I would add a picture of my home made candler.

Friday, 2 March 2012

Incubation, Day 8

Last night, I unplugged the incubator and carried it into the darkest room in my house at night (The bathroom), to do a little candling.  

For Candling I use my big Mega Light.  I don't have a Candler yet, but this seems to work ok.  Some eggs I find hard to see through, like dark shelled eggs, and the Easter Egger Eggs.

When I candle, I shine the light through the fat end of the egg, and sort of rotate the egg and tilt it a bit to see what's going on in there.  At this stage, you can see blood vessles, and a dark shape in there.  As I watched I could see the dark shape moving around.  It's pretty neat, and gets more exciting as the eggs grow.  Candling can be addictive.

So This is what I had, and what I have now.

Started with:                                       Fertile:
6 Easter Eggers                                    3(?) Easter Eggers (the shells are hard to see though, so I left them all in)
11 Phyllis Diller (Polish X Frizzle)         8 Phyllis Diller
10 Cochin                                            8 Cochin
6 Blue Laced Red Wyandotte              5 Blue Laced Red Wyandotte
9 Polish                                               7 Polish
4 Silkie X                                            0
4 Silkie                                                2 Silkie

So, I'm not sure what happened with the Silkie X's.  I had a bantam cochin X in with Rotten Ronnie, and he was giving it for all he was worth with her and the little silkie.  I know that perhaps I should have given a few days more before I started collecting eggs (for all the breeds), so the first ones I collected didn't surprise me about not being fertile.

I was most surprised to see that the Blue Laced Red Wyandotte eggs were growing.  I really wasn't expecting it.  My roo got so frost bit this winter on his feet that I thought it would make mating hard for him.  But I guess where there is a will there is a way, and Frosty is able to do his job.  I'm really excited about this!

After I candled, I filled all of the water trays back up, put the incubator back on the turner and got it going again.

In my last post I was having temperature troubles.  Well, I turned the temperature up a bit at a time, until it reached a good temperature.  It seems to be holding quite well now.  I'm not sure why it had the drop, but I hope it stays good now.  As for the clicking, I tried the vaseline on the pin that holds the incubator, and haven't heard a click since!  I am really, really happy about this!

Thursday, 2 February 2012

Homemade Lemon Curd

Today I made some lemon curd.  My kids love this stuff.  It's super yummy on pancakes, crepes, cake filling, scones, toast or my kids will even eat it by the spoonful.  The taste reminds me something of lemon meringue pie.

Is this just not crying out to be made into Lemon Curd?

Lemon Curd

3 Large Eggs
1/3 cup Fresh Squeezed Lemon Juice
1 Tbsp finely grated Lemon Zest 
3/4 cups Sugar
4 tbsp Unsalted Butter, cubed and at room temperature


In a stainless Steel bowl (I used my metal enamel one)  over a sauce pan of simmering water, whisk together eggs, sugar and lemon juice.  (Before I add the sugar, and lemon juice, I strain out the squiggly bits of the egg.)  If you have a double boiler, I imagine you could just make it in that.

Cook stirring (or whisking) constantly to prevent curdling until mixture is thick like sour cream (or 71*c).  Takes about 10 minutes.  If it's taking to long turn the heat up a little bit.

Remove from heat and pour through a find mesh strainer, to remove any lumps (if you didn't remove the squiggly bits before, this will do it now) into a stainless bowl.  Immediately whisk in butter and lemon zest.

Cover and refrigerate.

Keeps in the fridge for up to 1 week.

Who could resist a crepe filled with lemon curd, whip cream and strawberries?  It's like a little taste of sunshiny heaven!


Angel Food Cake Recipe

I am very proud to say, that today for the first time ever, I attempted a Angel Food Cake from scratch!  Oh, yes I did!  For years I have been contemplating this seemingly impossible mission, asking my self, "Could I really do this?  Do I dare?"  Well, finally I took the plunge into the world of Angel Food Cake from scratch.  And I am pleased as punch to say, it turned out great!  

I had dozens, and dozens of eggs.  Most of them were small banty eggs, which taste just as good as any other egg, but are only half the size.  Anyways, these eggs were just screaming today when I opened the fridge, "Use us!  Use us!"  So I put them to use!  I made Angel Food Cake, Fresh Lemon Curd (triple batch), and Eggnog (double batch).  Yes, I had that many eggs.

So, here goes!  Here's a Angel Food Cake recipe.  It wasn't as hard as I thought it would be, although I was wondering if I beat the eggs to stiff enough peaks, and scared of over mixing when I folded in the flour.

Angel Food Cake

12 Eggs  (1 1/2 cups whites)
1 1/4 cup Icing Sugar
1 cup Flour
1 1/2 tsp Cream of Tartar
1 1/2 tsp Vanilla
1/2 tsp Almond Flavoring
1/4 tsp Salt
1 Cup Sugar

Separate eggs, putting Whites in a metal bowl, and the yokes in a separate one (you can use most of these for something else like eggnog.)  Bring egg whites to room temperature.

Sift Icing Sugar and Flour together together 3 times to make sure it is well blended.  Set aside.

Add Cream of Tartar, Extracts and salt to egg whites.  Beat on high speed, gradually adding sugar.  Continue beating until sugar is dissolved and stiff glossy peaks form.

Gently fold in flour 1/4 cup at a time (I used my mini strainer to sprinkle it over the top of the batter).  Use a large whisk or spatula and gently fold it into the egg whites.  Do not over mix or it will deflate the batter.

Gently spoon the batter into an angel food cake pan.  Do not Grease pan!  Cut through batter with a butter knife to remove air bubbles.  Carefully smooth out top.

Bake at *350 for 40 - 45 minutes, until golden, tooth pick comes out clean or springy when touched.

Some of the Makings of Angel Food Cake!  I used banty eggs and brought the whites up to equal 1 1/2 cups.

And here is my finished cake!  

This Cake is going to be awesome with the Lemon Curd.  I am posting the recipe later this evening.